Understanding the role of a battery gauge for e-bikes
Why a Battery Gauge Matters for Your Electric Scooter
When you ride an electric scooter, knowing your battery status is essential. A battery gauge is the item that displays your battery level, helping you avoid unexpected power loss. It acts as a digital indicator, showing the voltage and power left in your battery pack. This is especially important for electric vehicles, where running out of battery can leave you stranded far from a charging point.
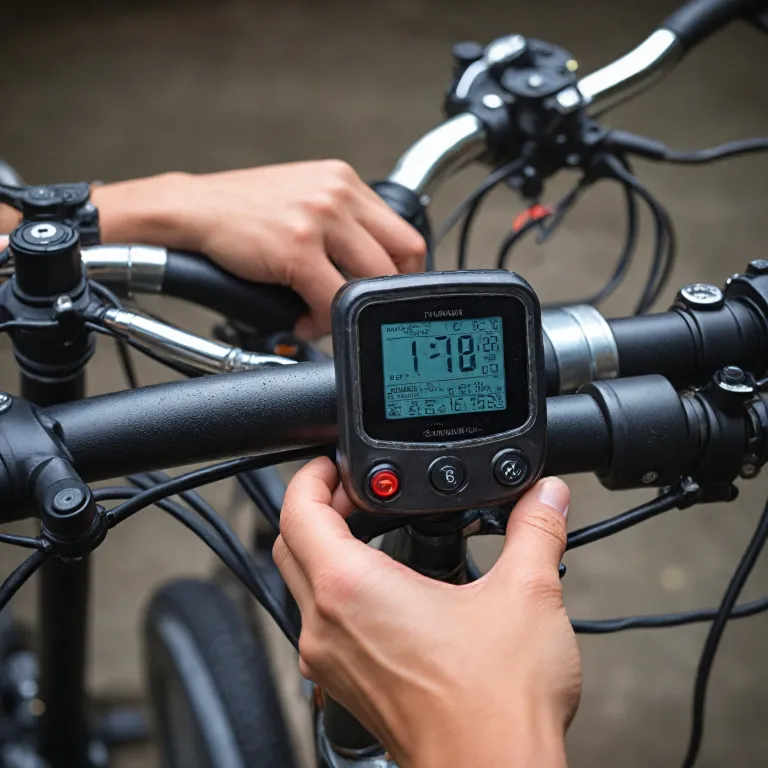
Most modern scooters use a digital display or LED battery meter. These gauges can show the voltage range, sometimes with color-coded lights—green for full, red light for low. Some even feature a steel bezel for durability or a black background for better visibility. The indicator battery is often mounted near the headlight or handlebars, making it easy to check your battery level at a glance.
- Power consumption: A good battery gauge helps you monitor how much power your scooter uses, so you can plan your rides better.
- Voltage accuracy: Accurate volt readings let you know if your volt battery or lifepo battery is performing well.
- Early warnings: A reliable indicator can alert you before your battery runs out, preventing damage to your battery pack.
Choosing the right gauge is not just about price or a cheap display. It’s about finding a meter that matches your scooter’s voltage and power leads. Some riders prefer a digital volt meter, while others like an LED indicator with a clear display. The right gauge can even help expand your battery’s lifespan by preventing deep discharges.
For a deeper dive into how these components work together, check out this guide on understanding the essential components of electric scooter mobility.
Whether you ride a golf cart, an e-bike, or an electric scooter, a quality battery gauge is a small item that makes a big difference. It’s your main indicator of power, helping you ride with confidence and avoid surprises.
Key features to look for in a battery gauge
What Makes a Good Battery Gauge for Your Electric Scooter?
Choosing the right battery gauge is essential for keeping track of your electric scooter’s battery status. The right item helps you monitor your battery pack’s voltage, power consumption, and overall health. Here are some key features to consider when selecting a battery gauge:
- Voltage Range Compatibility: Ensure the gauge matches your scooter’s volt battery or lifepo battery system. A mismatch can lead to inaccurate readings or even damage the indicator battery.
- Display Type: Digital displays are popular for their clarity. Look for a digital meter with a clear LED battery or LCD display. Some models use a green, yellow, and red light system to indicate battery level at a glance.
- Durability and Build: A steel bezel and a robust black casing help the gauge withstand daily use and vibrations from electric vehicles or golf carts. Water resistance is a plus for outdoor riding.
- Power Leads and Installation: Check if the gauge comes with power cable and power leads that are easy to connect. Some models offer a simple click expand mechanism for quick setup.
- Indicator Features: Advanced gauges may include a headlight indicator, low battery warning, or even a power off function to save energy.
- Price and Value: While cheap options exist, investing in a reliable gauge can help expand your battery’s lifespan and avoid unexpected power loss.
For a deeper dive into battery gauge options and how they work with different battery types, check out this comprehensive guide on Go-Go scooter batteries.
When comparing models, pay attention to replies views and user feedback on forums. This can reveal real-world performance and any common issues. A well-chosen battery gauge gives you confidence in your scooter’s range and helps you avoid getting stranded with a dead battery.
How to install a battery gauge on your electric scooter
Preparing for Installation: Tools and Safety
Before installing a battery gauge on your electric scooter, gather the right tools and make sure your workspace is safe. You will typically need a screwdriver, wire strippers, and electrical tape. Always disconnect the battery pack before starting to avoid accidental short circuits or shocks. If your scooter has a headlight or other electronics, check their power leads to avoid interfering with them during installation.
Step-by-Step: Mounting and Wiring the Gauge
- Choose the right spot: Select a visible location on your scooter’s dashboard or handlebar for the battery meter. Many riders prefer a spot near the headlight or throttle for easy monitoring of battery status.
- Secure the gauge: Use the mounting hardware provided, such as a steel bezel or bracket. Make sure the item is firmly attached and the display is easy to read, whether it’s a digital or LED battery indicator.
- Connect the power cable: Identify the positive and negative terminals on your volt battery or battery pack. Connect the power leads from the gauge to these terminals. Double-check the voltage range supported by your gauge to ensure compatibility with your scooter’s battery (for example, lifepo battery or standard 36V/48V packs).
- Test the indicator: Once connected, power on your scooter. The gauge should display the current voltage or battery level. Some digital displays show a green light for full charge, shifting to red light as power drops. If your gauge has a backlit LED display, confirm it is visible in both daylight and at night.
Tips for a Clean and Reliable Setup
- Route wires neatly along the frame to avoid tangling with moving parts.
- Use electrical tape or zip ties to secure loose cables.
- If your gauge includes a waterproof or black casing, make sure all connections are sealed against moisture.
- For scooters with additional electronics, consider the total power consumption to avoid overloading circuits.
Installing a battery gauge is a practical way to expand your awareness of battery status and voltage. It helps you monitor power consumption and plan your rides more effectively. For those interested in exploring more advanced electric vehicles or even golf carts, check out this guide on finding the best electric chariot for sale. A well-installed indicator battery or meter can make a big difference in your daily electric scooter experience, whether you opt for a cheap analog gauge or a premium digital display.
Common issues with battery gauges and troubleshooting tips
Recognizing Battery Gauge Problems
Even the best battery gauge on your electric scooter can run into issues. If your digital display suddenly shows inconsistent battery status or the indicator battery jumps from green to red light without reason, it’s a sign something’s off. Sometimes, the gauge might not show any voltage at all, or the led battery meter flickers. These problems can affect your confidence in your scooter’s power and may even leave you stranded if not addressed.
Common Troubles and What Causes Them
- Loose Power Leads or Cables: A poor connection between the battery pack and the gauge can cause the display to cut out or show the wrong voltage range. Check the power cable and connectors for any signs of wear or looseness.
- Incorrect Voltage Range: If your gauge isn’t matched to your volt battery or lifepo battery, the readings will be inaccurate. Always ensure the gauge matches your scooter’s battery type and voltage.
- Faulty LED or Digital Display: Over time, the led or digital display can fail, especially on cheap models. If the display is dim, flickering, or stuck, it may need replacement.
- Water or Dust Ingress: Exposure to the elements can damage the gauge, especially if it lacks a steel bezel or proper sealing. Look for condensation or dirt inside the display window.
- Power Consumption Issues: Some battery meters draw more power than expected, draining your battery faster. If you notice your battery level dropping quickly after installing a new gauge, check the item’s specs.
Quick Troubleshooting Tips
- Double-check all wiring connections, especially the power leads and ground wires.
- Test the gauge with a multimeter to verify voltage readings match the actual battery output.
- Inspect the indicator for physical damage or corrosion, especially on the black or green wires.
- Replace the gauge if the display remains blank or the led battery indicator does not respond after resetting connections.
- For digital meters, try a reset by disconnecting and reconnecting the power cable.
When to Seek Professional Help
If you’ve tried these steps and the battery gauge still doesn’t work well, it may be time to consult a technician. This is especially true for electric vehicles with complex wiring or integrated headlight and battery meter systems, such as golf carts or advanced electric scooters. A professional can check for deeper issues, like problems within the battery pack or controller.
Regular maintenance and prompt troubleshooting will help you get the most accurate battery status readings, ensuring your scooter’s power is always ready for your next ride.
How a battery gauge can extend your e-bike’s lifespan
Why Monitoring Battery Status Matters
Keeping an eye on your battery gauge is more than just knowing when to recharge. A reliable digital indicator helps you track the voltage range and battery level, so you avoid deep discharges that can shorten your battery pack’s lifespan. For electric scooter and e-bike owners, understanding the real-time power consumption through a volt meter or LED display is key to maintaining battery health.
How a Gauge Protects Your Battery
When your battery gauge displays accurate voltage, you can prevent overcharging and undercharging. Both can damage your battery, especially with lithium or LiFePO batteries. A good gauge, whether it’s a green LED indicator or a digital display with a steel bezel, alerts you with a red light or a drop in the meter reading. This early warning system helps you act before permanent damage occurs.
Extending Battery Life with Smart Use
- Regularly check your indicator battery to avoid running the battery flat.
- Use the gauge to monitor power leads and power cable connections for any irregularities.
- Choose a gauge that matches your battery’s voltage range for accurate readings.
- Look for features like a clear LED battery display or a black digital meter for easy visibility, even in low light near your headlight.
Choosing the Right Item for Longevity
Not all battery gauges are created equal. Cheap options may lack the accuracy or durability needed for electric vehicles like scooters or golf carts. Investing in a quality indicator with a robust display and reliable replies views can help you expand your battery’s usable life. A well-chosen gauge ensures you always know your battery status, helping you avoid costly replacements and keeping your ride smooth.
Comparing popular battery gauges for e-bikes
Popular Battery Gauges: Features and Performance Compared
When choosing a battery gauge for your electric scooter or e-bike, it helps to compare some of the most popular options on the market. Each gauge offers different features, display types, and compatibility with various battery packs, including volt battery and lifepo battery types. Here’s a look at how some leading models stack up:| Item | Display Type | Voltage Range | Indicator Features | Installation | Price Range |
|---|---|---|---|---|---|
| Digital LED Battery Meter | Digital, LED | 12V–84V | Green, yellow, red light; battery level bar | Simple, fits most scooters | Cheap to moderate |
| Analog Steel Bezel Gauge | Analog needle | 24V–60V | Classic meter, black face, indicator battery | Requires panel cutout | Moderate |
| Waterproof Digital Voltage Display | Digital, backlit | 6V–100V | Voltage, battery status, red light warning | Easy, plug-and-play power cable | Moderate |
| Golf Cart LED Battery Indicator | LED bar | 36V–72V | Green/red/yellow bars, power leads | Simple, adhesive mount | Cheap |
- Display: Digital gauges with LED or backlit screens are easier to read, especially in low light. Analog meters offer a classic look but may not be as precise.
- Voltage Range: Make sure the gauge matches your battery pack’s voltage. Some digital meters cover a wide voltage range, making them suitable for different electric vehicles.
- Indicator Features: Look for models with clear battery status indicators, such as green for full, yellow for medium, and red for low power. Some also show real-time voltage and power consumption.
- Installation: Most digital and LED meters are easy to install with basic power cables. Analog and steel bezel gauges may require more effort, like cutting a panel.
- Price: Cheap models can be reliable for basic needs, but higher-priced gauges often provide more accurate readings and extra features like waterproofing or expanded voltage range.